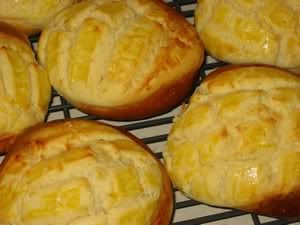
I made these buns following Jodelibakery and it turned out really good. Thanks Jo for the detailed instructions.
Ingredients:
Makes 15
(A) Sponge:
350g High protein flour
2g instant yeast
210ml water
(B) Main dough:
150g High protein flour
10g instant yeasts
100g castor sugar
8g salt
8g bread improver
20g milk powder
35g water
50g butter
25g shortening
For Glazing
1 small egg, light beaten
(C) Polo skin:
50g butter
50g margarine
100g icing sugar
a pinch of salt
1 large egg, lightly beaten
8g milk powder
200g all-purpose flour, sifted
Method:
To prepare sponge:
Combine all ingredients in (A) in a mixing bowl and knead with a dough hook at low speed. Stop kneading when all ingredients are just combined to form a dough .
In an oiled mixing bowl, prove dough for 4-5 hours until surface of sponge dough looks perforated and forms spider- web-like structure when pulled away from edge of mixing bowl.
To prepare Polo skin:
Sift icing sugar and milk powder into a mixing bowl. Add butter, margarine and salt.
Beat mixture until light and fluffy. Add beaten egg gradually, a little at a time.
Fold in sift flour until a smooth polo skin dough is obtained.
Refrigerate skin dough in fridge if it is sticky and too soft to work with.
To prepare main dough:
Combine sponge dough prepared earlier and all ingredients (B), except water, butter and shortening, in a mixing bowl.
Use dough hook of your stand mixer to knead the mixture at low speed (Speed 1 of Kitchenaid).
When all ingredients are just blended, add water gradually and continue to knead until the surface of dough looks smooth.
Add butter and shortening a little at a time. Use medium-low (Speed 2) speed to continue kneading dough for about 10 minutes. Increase to medium-high speed (Speed 4) and knead for further 10 minutes. The dough should be elastic, smooth, non-sticky and pull away from the sides of the bowl. To test, stretch a pinch of dough. This dough should form a thin membrane before it breaks.
Divide dough into 65g portions. Roll each into a ball and rest for 10 minutes.
While dough is resting, divide polo skin dough into 30g portions. Round up. Dust each polo skin with flour and press to form a round thin sheet. Spray water on surface of bread dough. Lightly press polo skin dough on each bread dough so that it covers 90% of the bun's surface.
Prove bread for 1 hour or until double in size (it may take longer depends on weather). If the polo skin does not break as a result of the proving, use a knife to lightly draw pineapple skin pattern on the skin.
Brush polo skin with beaten egg.
Bake in preheated oven at 200 degC for 15-20 minutes.
NOTES:
Characteristics of bread made using Sponge & Dough Method compared to Straight Dough Method:
Long proving time stabilises the dough, which in turn enables sufficient hydration of the dough. As a result, ability of dough to hold more moisture is enhanced.
Long proving time enables various chemical activities by the yeasts.
Bread fermented using this method has better flavour.
Bread baked using this method is moist and soft.
The stretching gluten network of sponge dough results in larger volume bread. Not suitable if you prefer chewy instead of soft bread.
In general for all breads making, the amount of liquid (eggs and water in this recipe) is variable. It depends on types of flour used, type of liquid used, temperature and humidity of atmosphere at the time of making the bread. You may need to adjust the water content of a particular recipe accordingly.
This formula is a commercial bread formula. Buns made using this formula stay soft for at least 2 days. However, it is not advisable to knead this dough by hand. It is too soft and sticky to work with. Remember I used to suggest 2-1/2 hours fermentation time in my previous sponge & dough recipes? In this recipe, I increased the fermentation time to 4-5 hours (room temperature), to give better flavour and volume to the breads.
There is another approach. If you do not want to wait 4-5 hours for the sponge to ferment, make the sponge before you go to bed a night before you actually want to make the buns. Refrigerate the sponge in refrigerator for about 12 hours. Thaw the sponge slightly before you use it.
For step by step instructions in pictures click here http://jodelibakery.netfirms.com/, then Breads, Polo Buns
Serves

Thursday, July 21, 2005
Polo Buns
Subscribe to:
Post Comments (Atom)
22 comments:
I tried making these today - in fact, i just took them out of the oven. Before I put the buns in the oven to bake, I really thought they'd turn out really nice.. but somehow, rather than just the topping being browned, the WHOLE top of the buns were browned. I don't know what went wrong - could it be that I didn't brush them with enough beaten egg? or did I preheat the oven for too long? Also, the tops browned before the buns cooked :'(
joanna
you have answered your own question. yes, your oven is too hot for these sweet buns. invest in an oven thermometer, it is worth it. my oven temp. is never right and i depend on it.
use the middle rack of the oven.
Dear Lily,
What is bread improver, where can you buy it?
Sue
sue
the bread improver came from malaysia but if not available you can still make pretty soft buns without them.
Hello -
First of all - I LOVE your blog. Keep up the good work. From your blog, I am able to help make dishses that my husband love even though I am not a Malaysian Chinese.
Question: What is a High Protein flour?
Thanks ~ Rien
Rien
thank goodness i found your comment cos blogger does not get the comments through to my email and i cannot tag the comment to which recipe.
high protein flour is bread flour
Hi Lily
Great recipes you have on your blog!
Would like to try making these buns. Can you tell me what is Shortening?
TQ
Manda
Hi,
I was making this but I didnt realize it until it was too late. For the Main dough, it says add in all the ingredients from (C) except for the water, butter and margarine. Does this also include the egg because in the end, it says brush with egg.
@ Manda Shortening is white solid fat that can be derived from either animal or vegetable. It gives pastries a tender texture.
veggiehead
my apologies to the confusion in the recipe. it has been quite sometime that i made this and when i posted it, i did not realise that the egg for glazing is in the middle of the ingredients.
i should edit to make it clearer
Hi Lily,
When you mentioned that we can proof it overnight by leaving it in the fridge, when want to use it, take it out to thaw it slightly. Once thaw, we can shape it and put in whatever ingredient we want and proof for another 10min and bake it. Is it correct? This means that we can also prepare the dough days before hand and take it out only when we want to bake? Will it affects the texture?
Thanks for your time.
Esther
esther
yes, you can knead the dough, let it rise until double it's size, then leave it in the fridge. The next day, take it out, let it come back to room temp, then shape, let it proof again before baking.
the long proving actually improves the texture and the bread tasted so much better. Bread with just water and salt benefit more from long proving.
Hi Lily,
Thanks for your reply.You mean that i have to let it proof double the size before puting in the fridge? Oh..then i cannot have a early sleep then...haha....the dough will proof in fridge? Cos i read it somewhere and said that it proof best under the sun? Kindly advise. Thanks again.
anonymous
good sweet bread can be shaped after the first rise/proof and it has to be double the original size. if you are kneading the dough in the breadmachine, it will take the machine to knead and proof the dough in 1 1/2 hr. You can shape your dough into buns now and let it proof until the buns are double in size, which will take 45 - 1 hr depending the time of year you are making the bread.
if you do not wish to shape them, you can leave it in a ziploc bag and leave in the fridge. the dough will continue to rise even in the fridge. When you have time to shape them, take it out of the fridge and leave it until room temp.. Shape and let it proof before baking.
Hi Lily,
thanks so much for your reply. I know what to do liao...Thanks again. Sorry for forgetting to put in my initial in my ealier mail.
Esther
Hi Lily,
I love Polo Buns and I would really love to try making them myself!!
However, I'm new to baking and I don't really get the meaning of proofing. I read from the internet that proofing in cookery term is to cause the dough to rise by adding shortening etc. Can you kindly explain it to me?
anonymous
to proof means to let the dough rise usually rising to double the original size. this can only happen to yeasted dough to make bread - meaning that yeast is the leavening agent.
Use instant yeast, this is the best yeast cos you can use it straight away and do not have to use warm water.
thx lily, I have another question. Is dry yeast instant yeast?? I saw dry yeast but I can't seem to find instant yeast. Also, whats the difference between high protien flour and normal flour? Can I use bread flour instead or any other flour?
thx alot =)
anonymous
dry active yeast is not the same as instant yeast, it needs to be activated before using. Rapid rise or breadmachine yeast is instant yeast.
Bread flour is high protien flour and you could use normal plain flour for this recipe but knead longer to achieve the window-pane stage.
Hey Lily,
Love you blog and recipes and still trying to keep myself motivate when comes to cooking. Question, can this recipe be used in bread maker machine? Just wanna try it out and family don't have patience with me proving the dough for way too long. Thank you!
shirley
absolutely but you would have to put in the ingredients into the breadmachine bowl in this order - first the sponge starter, then the liquid, follow by the other ingredients and ending with the instant yeast on top. If you are using active dry yeast or dry yeast which needs to be activated with water, then put in together with the liquid, then the dry ingredients. Use the dough function.
Hi Lily,
So if i want to make this bread using bread machine do i still have to mix, knead and prove the sponge dough first? Plus how long should i use to prove the main dough?
Thanks.
christine
yes, you would have to make the sponge, then put it all in bread machine with the rest of the ingredeints. you can always use the straight dough method follow my Conchas recipe http://lilysbest.blogspot.com/2012/11/conchasmexican-buns.html
Post a Comment