Foodie
Showing posts with label Kuih Muih. Show all posts
Sunday, February 21, 2016
Kuih Talam Revisited
Although my previous recipe Kuih Talam is ok but my need to tweak more for a better texture has been on my mind for the longest ever. I think i have found what i tweaked is to my satisfaction and i have to post it, not for my own reference but for everyone or anyone who will be interested to make a perfect kuih talam...........
Continue to read and for recipe clickHERE Read More......
Wednesday, February 09, 2011
Pong Siak Ku
It was on this day, the eight day of the Chinese New Year that my family had to gather at Granpa and Grandma's home where the Celebration of the Hokkien New Year will be. It was celebrated with more grandeur compared to the 1st day, this was because our Hokkiens ancestors were in hiding in the sugarcane plantation from the bandits and only had the chance to celebrate the New Year on the 9th day. The good had triumphed over evil and the belief was and still is, that the Jade Emperor (Thee kong – translated as “king of the heavens”) protected our Hokkien ancestors from being caught, which is why we offer thanksgiving prayers to him..
Continue to read and for recipe HERE Read More......
Labels:
Chinese,
Festivals Dishes,
Hokkien,
Kuih Muih,
Snacks
Saturday, January 29, 2011
Spiku/Kue Lapis Surabaya
It is good to know the fact that the name of this cake 'Kue Lapis Surabaya' is unknown to the citizens of the city of Surabaya, Indonesia. So, don't go around asking about Kue Lapis Surabaya if you meet anyone from Surabaya, they will be just as blank as you are. Ask them about 'Spiku' and there will be a conversation until the cows come home I have seen many types of 'Spiku' and they all look great but since this is the first for me have to have a go for the original which consists of three layers of very moist and dense sponge type cake with the chocolate layer cake in the middle, sandwiched between two golden sponge cake. Every layer require 10 egg yolks!!!!!!!. Shocking but yes, without any egg whites, the texture of the cake is soft, moist and rich. Good european butter added extra richness and i should say, it's a requisite.
Continue to read and for recipe HERE Read More......
Labels:
Cakes,
Festivals Dishes,
Indonesian,
Kuih Muih,
Party,
Snacks
Monday, September 13, 2010
Kuih Lapis Rainbow
It is strange but it is true with our tastebud, there are so many kinds of food that i do not like when i was younger but love them now. Kuih Lapis which is chewy is one of them, I like this Traditonal Nyonya Kuih Lapis which is rich and soft. But!!! now that i have tried making this recipe after too many requests for this chewy type, and surprising i liked it. I think i know why i did not like this chewy type cos i have eaten too many badly made ones. I found that this kuih will be good if a considerable amount of thick coconut milk was used in the recipe. I shall not call this 'Nine Layers Koh' cos i have made it with 10 layers. I wanted to have 3 colors, so i ended with 9 layers - 3 layers of every color and a topping layer thus making it 10 layers.
Ingredients:
A:
80 gm rice flour
80 gm all-purpose flour
180 gm tapioca starch
2 x 400ml cans coconut milk(SAVOY brand)
100 ml water
240 gm fine granulated sugar
1/8 tsp potassium carbonate & sodium bi-carbonate solution aka 'kan sui'
1/4 tsp salt
B:
Food colorings
Pandan paste
Vanillin
Method:
Mix all the ingredients A in a large bowl and then pass through a fine sieve onto to a large microwave-safe bowl.
Microwave the batter, one minute at a time, stirring after every minute. I did 3 times(my microwave is only 900 watts). The sugar should have dissolved and the batter thickens slightly.
Measure 3 portions weighing 435 gms. Leaving the rest of the batter as the topping or last layer.
Leave one portion white and divide into 3 bowls - each weighing 145 gms.
Color the next portion pink and divide into 3 bowls - each weighing 145 gms.
Color the last portion with pandan paste and divide into 3 bowls - each weighing 145 gms.
Color the topping layer with a darker red color.
Heat a 9 inch greased pan in the steamer for 5 - 10 minutes, then pour in one of the white color batter.
Steam for 5 minutes and if the layer is cooked through, pour in one of the pink color batter and steam for 5 minutes..
When pink layer is cooked through, pour in the green layer and steam.
Repeat with these layerings until all 9 layers are done.
Finally pour in the topping layer and steam until cooked through and further steam the whole kuih for another 10 minutes.
Remove from steamer and allow kuih to cool to room temperature before cutting. Use a very sharp knife for cutting. Although i like the plastic crinkle cutter, it does not do a very good job on this chewy cake.
Serves
Read More......
Thursday, September 09, 2010
Kuih Gading Galoh
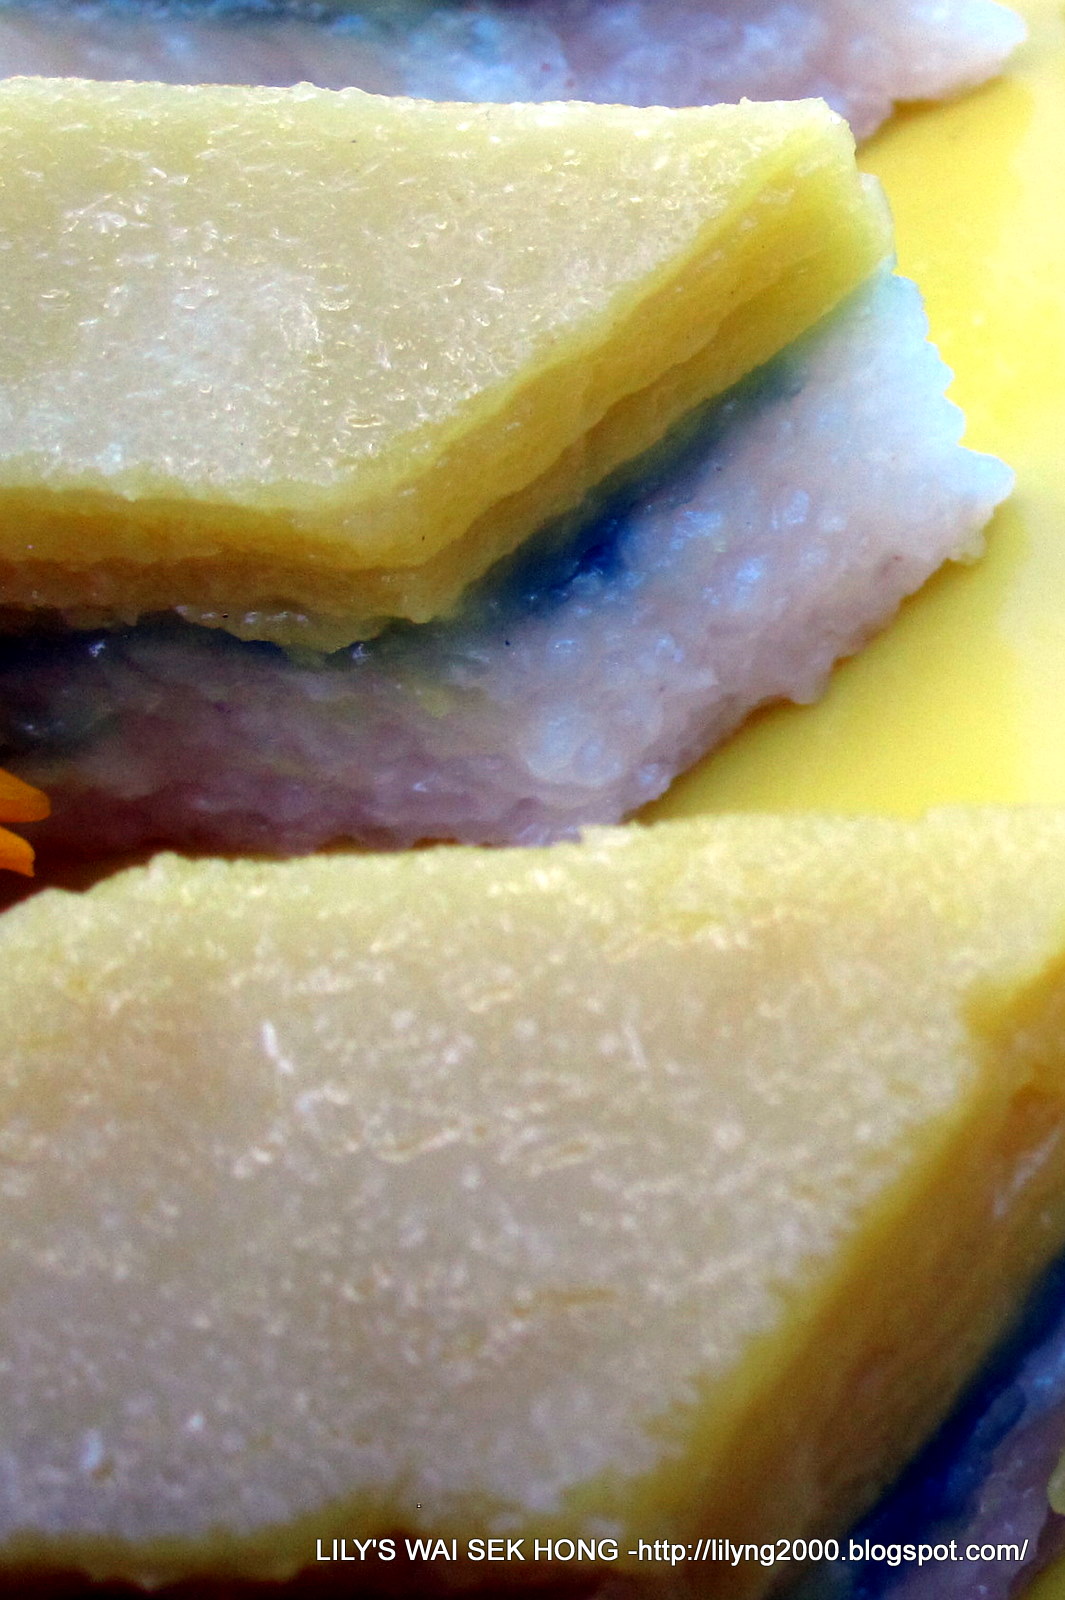
My sisters have always told me that i take too much upon myself in whatever i do, and they are absolutely right. And, do i learn???? No! Same old me, repeating my habits and trying to do too much. Like last saturday, i had a potluck to go to and not satisfied with just bringing one kind of kuih, decided to make another one at the eleventh hour. See, what happened to the most delicious kuih made, it was shabbly cut cos it was not cold enough and there was not enough time to do a good job. I hate myself for that but do you think i will make kuih in a hurry again, you guessed right, i will.
Ingredients:
Rice Layer:
1 1/2 cup glutinous rice - washed and soaked
100 ml thick coconut cream
Thin coconut milk - enough to cover the rice1 tsp kosher salt
2 pieces pandan leaves
1 tsp dried bunga telang - reconstitute with 1 tbsp hot water and a drop of vinegar
Topping:
3 large eggs
300 ml thick coconut milk
1/4 tsp salt
2 tbsp tapioca starch
1/2 cup unbleached all-purpose flour
3/4 cup sugar
Method:
Put soaked glutinous rice into the rice cooker and enough thin coconut milk to just covering the rice. Add salt and pandan leaves.
Press the cook function and as soon as the rice is cooked, discard the pandan leaves and pour in the thick coconut cream. Close the lid and leave on warm for 10 minutes for the coconut cream to marry into the rice.
In the meantime, mix the ingredients in a microwave-safe bowl and microwave on high for 1 minute and stir. Continue to cook for another 1 more minute. The mixture should still be runny.
Remove rice from the rice cooker and put it in a greased 9 inch cake pan and pressed the rice down. Sprinkle the coloring from the bunga telang on to the top of rice. If you like a marbled look, then you would have to stir in the color to the rice and then press down.
Put the rice to steam for 5 minutes, then pour in half of the topping. Steam the topping until cooked, then using a fork, roughen the surface with a fork before pouring in the rest of the topping. Steam on medium heat until cooked and done. Do not use high heat - patience will rewarded with a smooth topping.
When done, leave kuih to cool before cutting.
Serves
Read More......
Friday, June 25, 2010
Sweet Potato Ku
These are before steaming
These are after steaming
Ingredients:
For the dough:
150 gm orange sweet potato/yam - mash immediately after steaming and keep it hot.
150 gm glutinious flour
50 ml thick coconut milk
50 ml hot boiling water
1/4 tsp salt
2 tbsp cooking oil
Filling:
Follow the recipe from Angkoo Ah Mah Chew
Method:
Mix the glutinous rice flour, salt and coconut milk to the hot mashed sweet potato. Knead until dough does not stick to your hands - slightly on the wet side, it will dry out after resting. If the dough is soft and pliable, do not add in the water. Lastly add in oil and knead lightly till dough is shiny. Rest dough for at least 1 hr.
Scale the filling and dough according to the size of the mould. Flatten it and wrap in a filling. Seal and shape into a round/ Dust the mould with a little glutinious rice flour. Press firmly into the mould Knock and dislodge from mould. Place on oiled banana leaf. Continue process with the rest of the dough pieces.
Use tap water and wash off excess glutinious rice flour from the surface. Do it quickly and lightly before steaming the 'ku' over LOW heat for 5 - 10 minutes. Remove the steamer lid after 5 minutes to lower the heat as the pattern will not be as sharp if the heat is too high. Remove from steamer and brush with oil for a shiny surface.
Serves Read More......
Labels:
Dessert,
Festivals Dishes,
Kuih Muih,
Malaysian,
Snacks
Wednesday, June 09, 2010
Taro Ku
When i was growing up, the only 'ku' i know was colored red or orange with a sweet filling. Nowadays, 'ku' comes in all sorts of colors and shapes with either sweet or savory fillings. Thank you to enthusiastic cooks who come up with new ideas which kick up a few knotches to the traditional this kuih. Btw - 'ku' is in hokkien meaning Tortoise and Tortoise symbolizes longevity. When the 'ku' kuih is shaped like a tortoise shell, it creates a high symbolic and ritual value, very appropriate for ritual offerings during religious events. These 'ku' , it must be red in color and that is why it is called 'Angku' - 'Ang' means red in hokkien, is an important gift when a child is born (one month old) or during birthdays. Outside the ritual or gift context, it is also a very popular snack, eaten at all times of the day, be it for breakfast or tea=time. Have you ever tried pan-frying leftover/overnight 'Angku'? - they are delicious.
Below is a recipe with a new twist - Taro is added to the dough which gives the 'ku' a purplish hue and a fragrance which taro lovers will recognize. The filling can be sweet or savoury and a spicy one will be met with satisfaction.
Ingredients:
For the Dough:
150 g taro slices - steamed and mashed(keep warm)
150 g glutinious rice flour
50 ml water(use only if the dough is too dry)
50 ml thick coconut milk
1/8 tsp salt
2 tbsp oil
Purple food coloring/taro paste
Extra glutionious rice flour for dusting
Pre-cooked cooking oil for glazing
Banana leaves - cut into rounds and brushed with oil
Filling of your choice or follow this sweet filling recipe
Method:
Sieve glutinious flour with salt.
Add oil and purple food coloring/taro paste to the thick coconut milk and microwave it for 30 seconds.
Add warm mashed taro to the glutinious flour and add in the coconut milk and oil a little at a time, knead until a dough forms. Water is to be added only if the dough is too dry. Knead dough well until it is shiny. Rest the dough for 30 minutes.
Scale dough according to the size of your mould.
Flatten dough and roll into a circle. Put in some filling and wrap dough up.
Dust mould with glutinious flour and knock out all excess flour.
Press filled dough firmly into mould, knock and dislodge from mould. Place on oiled banana leaf and into steamer rack.
Continue process with the rest of the dough pieces.
Turn on the tap on low and place steamer under the running water to remove excess glutinious flour from the surface of the moulded kuih.
Steam kuih over low heat for 10 minutes. At 5 minutes, uncover the steamer to lower the temperature of the steam cos the pattern will be lost if too high heat is used for steaming. Cover and continue to steam until cooked.
Remove from heat and glaze surface with the precooked oil.
Serves
Read More......
Sunday, June 06, 2010
Kuih Pandan Lapis Batavia
I was left home alone one day, the silence was killing me. There were no one to bug me and knowing me, cannot sit still and do nothing - my sister said that 'it must be the catholic schooling' in us - we feel guilty if we are not doing something.' So, what a good time it was to stand in front of the oven and layer away. This is a scale down from Kuih Lapis Batavia, not by choice but necessity, cos i had only a dozen eggs. I have increased the sugar and egg white slightly thus making the batter lighter and the layers browned faster with the addition of a little baking powder and the batter was sweeter.
Ingredients:
250g butter at room temperature
60g fine granulated sugar
12 egg yolks
60g fine granulated sugar
1 tbsp brandy
2 tbsp condensed milk
80g cake flour
1 tsp mixed spice
1/4 tsp baking powder
4 egg whites
30g sugar
1/2 tsp cream of tartar
1/2 tsp pandan paste
Method:
1. Preheat oven to 350f . Line a 6 inch square baking pan with greaseproof paper, making sure that it fits exactly the base.Grease only the base of pan and greaseproof paper only. Do not grease the sides of pan..
2. Cream butter with 60g sugar till creamy.
3. Beat egg yolk with 60g sugar till thick. Stir in brandy and condensed milk.
4. Sieve flour, baking powder and mixed spice.
5. Mix butter and egg yolk mixture well. Fold in flour mixture by thirds and mix well.
6. Whisk egg white with medium speed till foamy, add in cream of tartar and continue to whisk till white in colour then add in sugar and whisk until thick, soft stiff peak.
7. Fold egg white into egg yolk mixture and mix well. Add pandan paste to 1/3 of the batter and leave the other 2/3 plain.
8. Spread 3 heap tbsp of batter evenly and bake for 10 minutes. Turn on the top fire only and brown the top of the first layer. For the second layer, spoon 2 heap tbsp batter into baking pan. Spread the batter evenly, put to grill . Grill till brown.(time for browning depends on your oven and how close the baking pan is placed near the grilling elements) Remove from oven, use a cake tester or toothpick to prick holes on the top of cake. For the third layer, use the pandan paste batter. Repeat the layering, 2 layers plain and 1 layer pandan, till batter finish. (Use the same type of spoons for the plain and pandan batter so that the layers will be even)
9. Unmould cake immediately and turn on to wire rack to cool.
Read More......
Labels:
Cakes,
Dessert,
Festivals Dishes,
Indonesian,
Kuih Muih
Monday, May 17, 2010
Sesame Balls
It is the most delightful moment when a recipe is successful and i can't wait to share. This will not be possible if i do not have generous friends who have shared many of their tested recipes and tt from Playing With My Food is my 'sifu' who so graciously emailed me this recipe. Thank you, tt, they were the best, with all the tips provided by you, these balls puffed up so well and they tasted umpteen times better than the dim sum restaurants. The family prefers the red bean filling and the restaurants strangely make them with either lotus or mung bean paste, so i had to make red bean filling.
Ingredients:
454 g glutinious rice flour
3 tbsp rice flour
2 tsp baking powder
200 g sugar
450 g water
1/2 tsp salt
2 tbsp oil
1/2 cup potato flakes (the kind used to make mashed potatoes)
Filling:
1 cup red bean
1 - 1 1/2 cups sugar
a pinch of salt
Method:
To prepare the filling:
Wash the red beans and put in the pressure cooker with enough water to cover the beans.
Cook uncovered for 10 minutes, then drain away the water.
Put the drained parboiled red beans back into the pressure cooker and add in 3 cups water.
Close the lid and pressurized for 30 minutes. Release pressure before opening the lid.
Using a sieve or a slotted spoon, remove the beans into a large microwave-safe bowl.
Add sugar and cook in the microwave on high until mixture is paste. Start with 5 mins at a time, stirring after every interval. Reduce the time as the mixture gets drier.
Cool before using.
To prepare the dough:
Mix together glutinious flour, rice flour and baking powder.
Bring water with sugar, oil and salt to the boil, add potato flakes. Stir to dissolve the potato. Immediately pour the hot mixture into the flour and mix until the flour absorbs all of the water.
Rest dough until it's cool enough to handle, then knead to make a smooth dough.(Dough is less pliable if it is kept for later use, perhaps it is only a problem for me cos of where i am - no humidity and i would advice that all the dough should be wrapped)
To make the balls:
wet your hands with water and take a piece of dough.
Wrap the filling and roll in sesame seeds.
Fry until golden, The frying time should take at least 15-20 mins, if it cooks faster then that the oil is too hot and your balls will not be hollow and will be soft as soon as you take it out of the oil. Press the balls against the wok with the ladle and it will puff up and keep stirring the balls for even browning.
Serves
Read More......
Monday, April 05, 2010
Curry Puffs
How can anyone be tired of eating curry puffs? To me, this is comfort food and I will never refuse one even though i am packed full and looked like the curry puffs that are offered to me. They are the most delicious morsels that i ever ate, with spicy curry paste for extra oomph and packed with soft potatoes, chicken/beef. They are deep fried to a guilty perfection with a crusty and crunchy exterior and to achieve this, the dough has to be rolled very thinly.
Ingredients:
Pastry:
1 1/2 cups all-purpose flour
5 tbsp margarine/shortening
1/4 tsp salt
1/2 tsp baking powder
3 tbsp water
Filling:
1/2 lb chicken meat - dced
1 small onion - chopped
1 tbsp Garam Assam Paste
2 tbsp curry powder for meat
2 large potatoes - peeled and diced.
1 tsp salt
1 tbsp sugar
1/2 tsp black pepper
5 tablespoons oil
Oil for deep frying
Method:
To make the filling:
Heat oil and fry the chopped onions until sweat through. Add the garam assam paste, curry powder and saute until fragrant. Add the chicken, potatoes, and 1 cup water, cook until potatoes are fork tender. Add salt and sugar to taste and cook until filling is dry.. Leave aside to cool.
To make pastry:
Using the food processor, add in flour, baking powder and salt, pulse to mix, then add margarine/shortening and pulse until it looked like breadcrumbs. Add water and pulse until the dough is combined into a ball.. Let it rest for 1/2 hour.
Roll dough out into a long rope and cut into small portions. Roll each portion into a very thin circle and put the filling in the center(amount of filling depends on the size of the circle). Fold pastry over to make a half circle and crimp the edges.
Deep fry in hot oil until golden.
Serves
Read More......
Tuesday, March 30, 2010
Tee nyah kuih
This 'kuih' is typically 'hokkien' and it is time that i talk about my heritage as hokkien 'lang' after being branded as a 'macau sai' by my paternal grandmother cos me and my siblings do not speak our 'mother tongue' that well or rather not at all. We spoke our Mother's tongue, cantonese, but it should not be our Mother's tongue but my Grandma's - Ah Po, who is cantonese. There was once when i was asked by my Ah Ma to tell this hokkien guy who came to look for my Ah Kong - 'ie kee liao pee la lui lee eh au pit' - hokkien guy seemed to understand what i said, while i myself took a long time to figure out what i said. Can any of my 'hokkian lang' readers tell me what i said?.
This kuih is a speciality and will appear on the table of hokkien families during hokkien festivals. My one and only Ah Koh, made the best tee nyah kuih and i would like my Ah Ma and Ah Koh to be proud of me by making this kuih although mine is not as good.
Ingredients:
1 lb rice flour
2 tbsps tapioca flour
1/2 tsp borax/ pang sar (optional)
2 tbsps potassium carbonate & sodium bi-carbonate solution
2000 ml/2 liters water
1 ½ tbsps cooking oil
1 tsp salt
Method:
Combine rice flour, tapioca flour, borax, potassium carbonate & sodium bi-carbonate solution, salt together in a microwave-safe bowl. . Add in the water, a little at a time, to prevent lumps. Give it a good mix before adding cooking oil and stir well and make sure borax is dissolved.
Cook in the microwave until a very thick consistency, stirring after every intervals.
Pour in a greased 9 inches round steaming tray and spoon the 2 tablespoons of tap water over surface of kuih.
Steam kuih over rapidly boiling water for one hour. Replenish water if necessary. To prevent condensation, wrap steamer cover with a large piece of cloth(using a bamboo steamer is the best).
Test for doneness with a wooden skewer(lidi) pierced in the centre, It should come out clean.
Cool kuih for a couple of hours before slicing.
Serve with Hong Bak or Red Cooked Pork or Tau Yue Bak
Serves
Read More......
Labels:
Festivals Dishes,
Hokkien,
Home Cooking,
Kuih Muih,
Rice
Subscribe to:
Posts (Atom)


