Foodie

Monday, August 30, 2010

Home Brewing - Glutinous Rice Wine

I have to confess that i have shyed away from brewing glutinous rice wine at home for the longest ever, all because of all the superstitions pertaining to brewing wine at home.  I finally buck up courage together with inspiration from my friend, Claire and tried making 2 batches, one plain and one with red rice yeast.  Claire came to help and all we had to do was to blend the yeast and start assembling the rice for brewing.  I had prepped the rice earlier by cooking it in the rice cooker, so that it will be cooled enough for assembling when Claire arrived.  I was so excited that i forgot to take pictures of the assembling.  I did not take pictures perhaps i was skeptical that the wine will be a success as i know that i will break all rules and superstitions - I did not have a mouthful of sugar when i started making, i talked alot and made it in broad daylight,  i did not leave the pot under the bed with a rusty knife on top, i let the 2 pots(crockpots) sitting on the dinning table, perhaps if you make the wine in a glass bottle, it will be better to put it away from the light.  According to one of the myths - one should leave the pot alone without peeking, i, of course, have been opening the lids of both the pots and checking for green stuff growing and have been tasting the wine as days go by.  Despite of being so rebelious, the wine turned out so sweet and not too alcohlic.  The one with the red rice yeast tasted better than the plain one and had more wine, perhaps the extra yeast present in the red rice gave the extra kick and for the extra wine, i think i had sprinkled in an extra cup of water. The whole process was worth it and now my younger friends can have Rice Wine Chicken during their confinement, just inform me and i will brew some.

Ingredients:

8 cups/2.2 lbs/1 kg long grain white glutinous rice
1 pc wine yeast (bigger kind brought from Malaysia)
1 pc wine yeast (small kind available in any asian stores here in the States)
1 cup red rice yeast (also available in the asian stores here)
2 cups filtered water for sprinkling.

Method:

Wash the glutinous rice, drain, and place in rice cooker with enough water to cover the surface(it is just like cooking regular jasmine rice). Put to cook, and when rice is cooked, remove from the rice cooker, then spread it onto foil covered baking sheets and leave to cool completely.(make sure new foil is used to cover the baking sheets)  Rice must be completely cold before use.

Using a clean coffee grinder, grind the wine yeast and red rice yeast into powder.

To assemble:

Sprinkle a little wine yeast mixture on to a crockpot and then layer with rice(wet hands with the filtered water and flatten a handful and use it for layering). 

Sprinkle with more rice yeast all over the rice and then sprinkle with the filtered water.

Repeat the layering - rice, rice yeast and water until all the rice is done.

Lastly pour the remainder of the filtered water.

Cover crockpot with a clean cloth and then the lid.

Leave it to ferment for 7 days, then open lid and give mixture a good stir with a clean wooden spoon.

Cover crockpot with the clean cloth and lid and leave to brew for another 14 days(the total brewing time is 21 days - if you prefer a stronger alcoholic wine leave for another 7 days).

Wine can be harvested on the 21st or 30th day.

Prepare a sieve or a colander and line it with a clean cloth.  Put it over a pot to catch the wine.

Put the brewed wine mixture onto the cloth and let the wine dripped.(patience in letting the wine drip slowly will result in very clear wine).

When all the wine has dripped and the residue is quite dry, remove the residue and store it in a jar or air tight container for many more other recipes.

Bring the wine to a quick boil (my wine started to boil at 180f and of course it is cos i am one mile above sea-level)

Let the wine cool before bottling.

Wine is now to be enjoyed in any way you wish.


Serves
Read More......

Tuesday, August 24, 2010

Pork Tenderloin in Sha Cha Sauce

There are sauces and sauces - endless selection and there are many more that i have not encountered with or have the opportunity to try cooking with them. Walk down the  Sauces'    aisle  in  any asian market and you will know what i mean.. I have not heard of Sha Cha sauce until my friend Belinda used it as a dipping sauce for her hot pot. She told me to add an egg yolk with the sauce and it was so delicious that i had to get a can. Not only is this versatile sauce good as a condiment, it can be a base for soups , as a seasoning for stir-fry dishes and as a rub for barbecued meats.


Ingredients:

2 pieces pork tenderloin (about 12 ozs each)
4 heaped tbsp Sha Cha Sauce
1/2 lb french beans
Cilantro for garnishing


Method:

Trim pork of any visible fat and membrane/silver skin.

Cut off 12 inches or so of butcher’s twine, and put the thin end of the tenderloin in front of you.

Fold the thin end back on itself so that the entire length of the tenderloin is uniformly thick.

Slide the butcher’s twine underneath the tenderloin, and tie the folded thin end with a simple loop and surgeon’s knot.

Cut off the excess string with kitchen shears, and you're ready


Rub on the Sha Cha Sauce on to the pork tenderloin and let it marinate for at least 1 hour in the fridge.

Heat a 12 inch skillet with 2 tbsp oil and brown the pork tenderloins on all sides.

Put in a preheated 425f oven for 10 minutes to finish the cooking.(10 minutes is only a guide, try not to overcook, since overcooking will cause the meat to dry out. It's a good idea to use a meat thermometer to test for doneness; cutting into the meat to test for color will cause too many good juices to run out. A range of 150° to 165° is usually recommended  but i like to take it out at 140 - 150.. This should produce tenderloin that's juicy, tender, and safe. Rest for 5 - 10 minutes, remove the butcher's twine before slicing, )

For the french beans, remove the ends, wash and wipe dry.

Heat about 1/2 cup of oil in a skillet and when oil is hot, deep fry the french beans until crinkly and soft.  Do not fry all the beans at once, fry by batches.

Put the fried french beans on a platter and top with sliced pork tenderloin.  Garnish with cilantro.

Enjoy


Serves
Read More......

Saturday, August 21, 2010

Winter Melon Soup/Toong Kua Tong

This summer has been hot, so this is a common summer soup to relieve heatiness and cool down the body. My maternal grandma - Ah Poh is Cantonese, so drinking soup is important to my cantonese part in me.  My Ah Poh does not know how to even boil a pot of water, she had a 'Mui chai' who came along with her when she got married.  I later found out that  was why i had 2 'Tai Yee Mah' cos Ah Poh had considered her as her daughter.  Although Ah Poh did not know how to cook, she was an expert in criticising all foods served.  She had been branded with the saying - 'Hue Than mng hue cheong".  I remembered that she reminded my mother that a little piece of 'Tai Tau Choy' had to be added to Winter Melon Soup to enhance the flavor of the soup.  There are a variety of additions you can add to make this soup flavourful and unique and 'Tai Tau Choy' is a must for me.


Ingredients:


1 slice Winter melon (based on the diameter of 8″ and thickness 2″)
1 lb Pork ribs
8-10 pcs Red dates - pitted
5 or 6 dried shitake mushrroms - soak
1 piece  tai tau choy - soak and wash away the salt
3-5 pcs Dried oysters/dried scallops/dried octupus/dried squid - soak
Salt to taste

Method:

Put pork ribs in the pressure cooker and put in enough water to cover the ribs.  Bring it to the boil and conitinue to boil until all the scums rise to the surface.  Remove all the ribs and wash away all the scums.  Discard the water in the pressure cooker and wash preassure cooker really well.

Cut winter melon into small cubes of 1″ (remove seeds and skin)

Put cleaned ribs back to the pressure cooker together with the rest of the ingredients except the salt.  Put in the water that mushrooms and dried octupus were soaked.  Top up with more water until it is enough to cover the ingredients.  Close the lid of the pressure cooker and pressurized for 30 - 45 minutes, counting from the time the pressure cooker starts hissing.

Turn off heat when cooking time is over and let the pressure released by itself before opening the lid.

Taste the soup before adding salt as tai tau choy can be very salty.

Enjoy


Serves Read More......

Thursday, August 19, 2010

Spinach, Mushroom and Ham Quiche

When i visited Seattle last year, i took the opportunity to meet up with my dear friend, TT.  Although TT can be the son that i never had(how i wish), his knowledge in the culinary arena surpass mine by many folds.  Visit his blog Playing With My Food and you will understand what i mean.  When i met up with him for dim sum, he gave me this book -The Sweeter side of Amy's Bread"  and wished me well by writing this - To Lily - May you always be on the "Sweeter" side of life".  I was quite choked up with his wishes and when i feel down, i always kept  this in mind.  So, out with this book and made this Quiche.  This recipe is a keeper, thank you TT, if not for you, making this lovely recipe will not be possible.


Read More......

Tuesday, August 17, 2010

Futomaki - Thick Sushi Roll

Futomaki are thick sushi rolls which includes various fillings. They are also known as fat rolls. My friend Sam who is a Sushi Chef told me that it is easy to make Sushi.  All i needed was some goodwill and a good guide, meaning that he will show me how.  Looking at his nimble fingers working with the rice, trying not to blink in case i missed some valuable tips, but i must have blinked, cos the roll was ready right before me,  like magic, my mouth was opened wide with astonishment.   I insisted that he would have to roll on slow motion and this time, he went extra slow, so i had more ideas of how a good sushi roll was done.  Then it was my turn,  i was so excited that i forgot all the tips and made a huge mess.  Our hungry friends could not wait for lunch, so Sam had to continue making lunch for us and i promised him that i will go home and try to remember his teaching and not make a mess.  You think that i will remember?  I did keep my promise , i made some and a mess too.


Sushi Rice:
Ingredients: 

2 cups sushi or short grain rice
2 cups water, plus extra for rinsing rice
2 tbsp rice vinegar
2 tbsp sugar
1 tbsp kosher salt or 2 tsp regular table salt

Method:

Place the rice into a mixing bowl and cover with cool water. Swirl the rice in the water, pour off and repeat 2 to 3 times or until the water is clear.  Pour enough water to cover rice and let it soak for 30 minutes.

Place the rice and 2 cups of water into the rice cooker and cook rice until done.

Combine the rice vinegar, sugar and salt in a small bowl and heat in the microwave on high for 30 to 45 seconds.

Transfer the rice into a large wooden or glass mixing bowl and add the vinegar mixture. Fold thoroughly to combine and coat each grain of rice with the mixture. Allow to cool to room temperature before using to make sushi

California Roll

Ingredients:

Juice of 1/2 lemon
1 medium avocado, peeled, pitted, and sliced into 1/4-inch thick pieces
4 sheets nori
1/2 batch sushi rice, recipe as above
1 small cucumber, peeled, seeded, and cut into matchstick-size pieces
4 crabsticks, torn into pieces


Pickled ginger, for serving
Wasabi, for serving
Soy sauce, for serving


Method:

Squeeze the lemon juice over the avocado to prevent browning.

Cover a bamboo rolling mat with plastic wrap.

Lay 1 sheet of nori, shiny side down, on the plastic covered mat.

Wet your fingers with water and spread about 1 cup of the rice evenly onto the nori.

Place 1/8 of the cucumber, avocado and crab sticks in the center of the sheet.

Grab the edge of the mat closest to you, keeping the fillings in place with your fingers, and roll it into a tight cylinder, using the mat to shape the cylinder. Pull away the mat and set aside. Cover with a damp cloth.

Repeat until all of the rice has been used. Cut each roll into 6 pieces.

Serve with pickled ginger, wasabi and soy sauce.


Read More......

Saturday, August 14, 2010

A Maize-ing Soup

Maize  was or is the term used  for Corn in the United Kingdom and Ireland and since Malaysia was colonised by the British, maize it was to me for the longest ever, until there came Sweet Corn in the Malaysian markets.  I did not realised that Maize and Corn are the same becauce the difference in taste and texture were totally different,  the maize was woody, starchy and it took a lot of mouth grinding to finish a cob, while the sweet corn needed no introduction espeicially when we are here in sweet corn Heaven.   In Chinese Medicine, corn and celery are used as a stomach tonic, carrot and tomato promote  digestion, lastly the humble potato heals inflammations and is used as an energy tonic.  With these goodness in a soup, what can go wrong? 


Ingredients:

2 ears of fresh corn - cut into 1 1/2 inch slices
3 large tomatoes - quartered
2 stalk celery - cut into 1 inch lengths
2 carrots - peeled and cut into 1 inch lengths
2 potatoes - peeled and cut into halfs
2 lbs pork spareribs/neck bones
Salt to taste


Method:

In the pressure cooker, put the pork bones in and enough water to cover the bones.  Bring to high boil and let boil until most of the scum is floating on top of the water.  Turn off heat and pour the contents through a colander.  Wash the bones thoroughly with cold tap water until all scums are removed. Wash the pressure cooker well, removing scum and fat that are stuck to the pot.

Put bones back into the clean pressure cooker and add in the corn, tomatoes and wai san with enough water the cover ingredients.  Make sure that the water level is not more than 2/3 full - pressure needs to be built with space.  Pressurized for 30 minutes and turn off heat, allowing the soup to continue to cook in the pressure.  Remove lid only when the pressure is totally off and add salt to taste.   If you are in a hurry for dinner, put pressure cooker under the tap and run the cold water over the lid of the pressure cooker,  this should bring the pressure down fast and you can soup on the table as soon as salt is added to taste.

Serves
Read More......

Friday, August 06, 2010

How to Make Yogurt in the Microwave

This summer, prices for a gallon of milk has gone down tremendously - only $1.49 for a gallon.  Thus making homemade yogurt less expensive.although it is already so much less than the store-bought ones.  Making your own  helps you control the amount of fat you consume but i find that whole milk yogurt is richer and tastes the best. Fruits and berries are of abundance and cheap too,  so do add as much or varieties into your yogurt, it is a real treat. Yogurt-making in any other way is a lengthy project, but using the microwave to make yogurt can save you some time in the process


 Ingredients:

Glass bowl

4 cups fresh milk
1/4 cup powdered milk (adding this gives a better texture)
2 tbsp. plain yogurt with active cultures  - from the supermaket is fine or leftover from a previous homemade batch

Food thermometer

Microwave

Plastic wrap

Dish towel


Method:
Take the plain yogurt out of the fridge and leave it out on the counter  - it has to be at room temp. (Yogurt will take a longer time to set if cold yogurt is used)

Pour 4 cups of fresh milk into a glass bowl that is safe to use in a microwave. Choose skim milk for a nonfat yogurt or whole milk for a richer yogurt. (i put  the milk in the container that the completed yogurt will be stored in the fridge - save me washing the glass bowl)

Add 1/4 cup powdered milk and stir well.

Put the bowl of milk in the microwave and heat it on high power for 3 - 4 minutes. The temperature of the milk should reach 175 - 180  degrees F. (Time to reach 175 - 180 f depends on the wattage of your microwave)  After 4 minutes or more, check the temperature with a food thermometer.(Cooking the milk is to kill unnecessary bacteria present)

Allow the milk to cool down for a few minutes. Keep the thermometer in the bowl and let it cool down until the temperature reads 100 degrees F(Higher temp will kill the culture)

Add 2 tbsp.plain yogurt with active cultures to the milk. This serves as your starter. Stir well.

Cover the bowl with milk and yogurt with plastic wrap (my container has a lid, so i just close it with the lid)and wrap a dish towel around it to provide additional insulation.(It is hot now, summer, so i do not need to wrap with a dish towel, i left it on the counter).

The yogurt will be set eventually and when set, put in the refrigerator to chill, it will set further.(If you like your yogurt sour, keep it longer on the counter before chilling in the fridge)

Enjoy with fruits, granola etc, anything your heart desires.

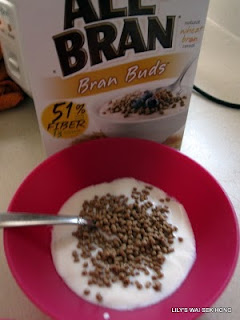
As part of the Foodbuzz Tastemaker Program, I received this  ALL-BRAN Bran Buds from Kellogg's and i have been enjoying it with my yogurt every morning.  Thank you Kellogg's.

.


 Serves
Read More......
Related Posts Plugin for WordPress, Blogger...