
Ingredients:
3 cups all purpose flour
1 1/2 teaspoons salt
1 Tablespoon sugar or honey
1 tsp instant yeast
1 1/4 to 1 1/2 cups water, - room temperature
2 tablespoons olive oil, vegetable oil, butter, or shortening
Method:
Using the food processor, mix the yeast in with the flour, salt, and sugar. Pulse to mix.
Add the olive oil and 1 1/4 cup water and pulse until all of the ingredients form a ball. If some of the flour will not stick to the ball, add more water (I did fine with 1 1/4 cup).
Once all of the ingredients form a ball, place the ball on a work surface, such as a cutting board, and knead the dough for approximately 10 minutes (or until your hands get tired).
When you are done kneading the dough, place it in a bowl that has been lightly coated with oil.
Form a ball out of the dough and place it into the bowl, rolling the ball of dough around in the bowl so that it has a light coat of oil on all sides. Cover the bowl with plastic wrap or a damp kitchen towel and set aside to rise until it has doubled in size, approximately 90 minutes.
When it has doubled in size, punch the dough down to release some of the trapped gases and divide it into 8 pieces.
Roll each piece into a ball, cover the balls with a damp kitchen towel, and let them rest for 20 minutes.(This step allows the dough to relax so that it'll be easier to shape.)
While the dough is resting, preheat the oven to 500 degrees with the baking stone.
After the dough has relaxed for 20 minutes, spread a light coating of flour on a work surface and place one of the balls of dough there. Sprinkle a little bit of flour on top of the dough and use a rolling pin or your hands to stretch and flatten the dough. You should be able to roll it out to between 1/8 and 1/4 inch thick. If the dough does not stretch sufficiently you can cover it with the damp towel and let it rest 5 to 10 minutes before trying again.
Spray a light mist of water onto your baking surface and close the oven for 30 seconds.
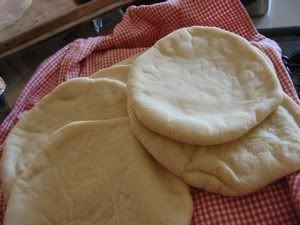
Open the oven and place as many pitas as you can fit on the hot baking surface. They should be baked through and puffy after 3 minutes.
Floydm's Notes:
(The purpose of kneading is to thoroughly combine the ingredients and to break down the flour so that the dough will become stretchy and elastic and rise well in the oven. A simple hand kneading technique is to firmly press down on the dough with the palm of your hand, fold the dough in half toward you like you are closing an envelope, rotate the dough 90 degrees and then repeat these steps, but whatever technique you are comfortable using should work.)
Uuse canola spray oil, but you can also just pour a teaspoon of oil into the bowl and rub it around with your fingers.
If you have a baking stone, put it in the oven to preheat as well. If you do not have a baking stone, turn a cookie sheet upside down and place it on the middle rack of the oven while you are preheating the oven. This will be the surface on which you bake your pitas.
Supposedly this step of spraying the baking surface with water reduces the blistering on the outside of your pitas. I've skipped it many times in the past and still been pleased with my breads, so if you don't have a bottle handy it isn't a big deal.
Thank you Floydm
Serves

Your Pita bread looks really good! Indeed why waste money buying those tough as paper pre-made pita breads from the supermarket?
ReplyDeleteThanks for sharing the recipe. I must trying making them some day soon too.
i love pita bread! i want to try. :) first time here. nice site. i will be back to explore more...
ReplyDeleteI love your blog. I am the AA wife of a Mediterranean man and A Chinese daughter and I am always trying to incorporate all of our different ethnic cuisines into our diet. I love that your site has recipes from different cultures. This is the first pita recipe that I have had success with. They actually PUFFED! Thank-you!! I can't wait to try more recipes as they all look delicious.
ReplyDelete